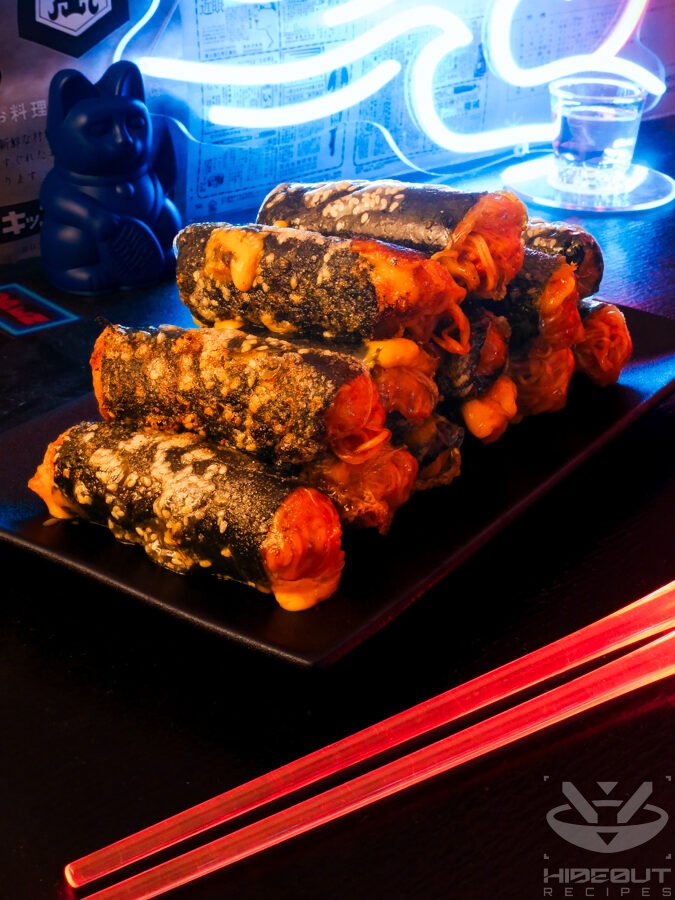
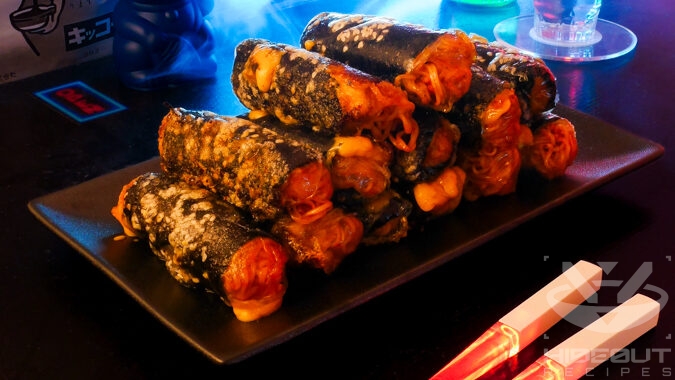
These cheesy pan-fried gochujang noodle rolls went viral a while back, and for good reason. Certainly not the healthiest dish, but sometimes you got to indulge in cheesy noodle goodness.
What an unholy abomination of grease and carbs. I love it.
A Patron
A rad fad
When recipes trend online, I sometimes try them out to see what the fuss is about. More often than not, it turns out that virality is based on gimmicks and flashy looks rather than great taste. This recipe is one of those rare exceptions that actually ended up making it into all the way into the Hideout collection, which means I’ve cooked it quite often by now. There were a few variations floating around, and trust me when I say that this is the best one (plus, measurements and instructions will actually be accurate).
I’m using the name from the trend, but these rolls are not very spicy at all. If you’d like them to be hotter, increase the amount of gochujang and/or gochugaru to your liking.
Measure twice, cut once
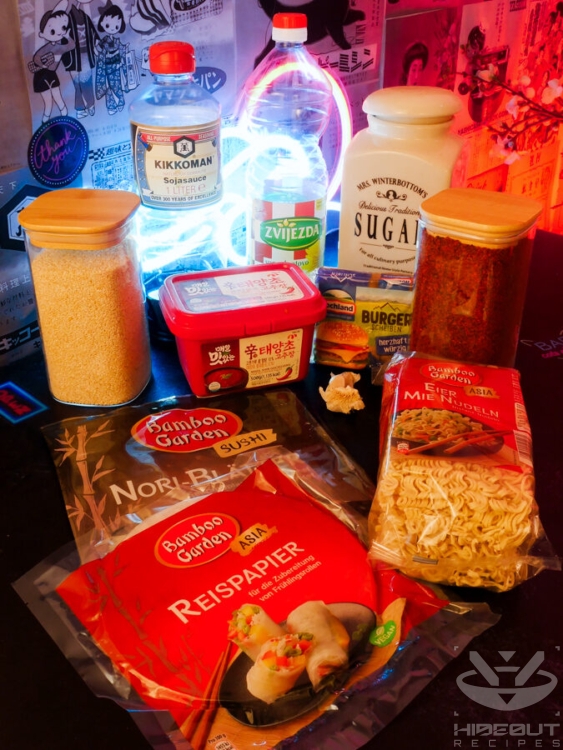
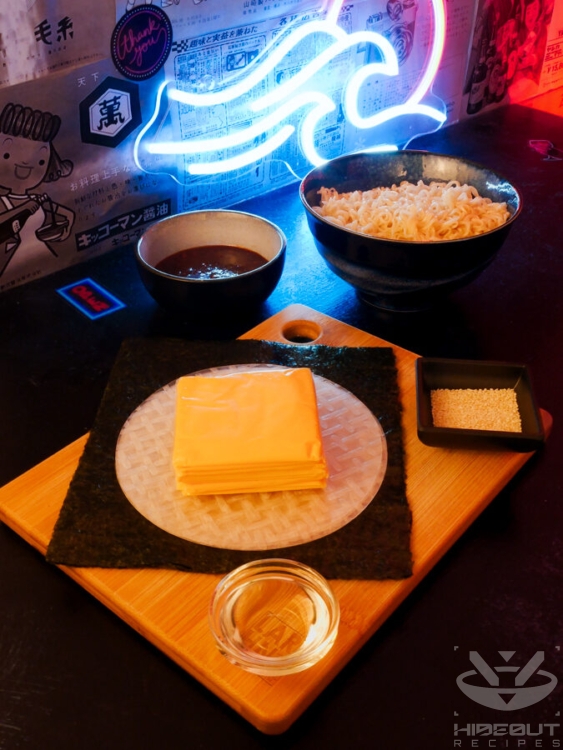
Speaking of measurements, you have to do a tiny bit of math if you don’t want to have leftover ingredients. Most (round) rice paper you find is around 22cm in diameter, which is suited for this recipe, but I have found that a smaller diameter of around 16cm yields the best results. Rolls don’t turn out too thick this way, improving the cheese-to-noodle ratio and making them easier to eat. Another big plus is that the standard-sized nori (about 18x18cm) have the ideal size when quartered (into 9x9cm squares), leaving the perfect rim on the rice paper and matching just about the size of a cheese slice. This way, you only need 1/4 nori per roll instead of 1/2. This is exactly the setup you see in the process photos below. All this means:
- If using small rice paper, the amounts indicated in the recipe will work exactly.
- If using larger rice paper, you need 1.5 times the cheese (put 1.5 slices on each roll) and double the nori leaves (cut them in half and then trim the length of the halves).
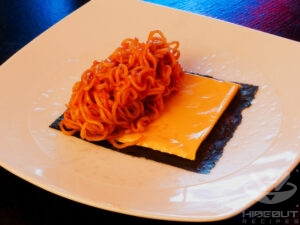
Ultimately, the most important part is that your nori leaf be smaller than the rice paper, leaving a rim around it that will stick together. The cheese meanwhile should just about cover the nori, and the noodles should cover at most half the cheese. You will have to trim the nori (I recommend using kitchen scissors), and maybe cut the cheese as well to make it all fit.
Assembling the rolls


The folding process is easy enough if you don’t overload the sheet with noodles and exert consistent (gentle) pressure throughout.
Only dip the rice paper into the water for a second, and keep your fingers wet to make it easier on yourself. Plus, for the love of everything that is holy, do not use a wooden surface, as the rice paper is incredibly sticky when wet and will immediately merge with it forever. A ceramic plate, for example, works much better.
You can make any amount of these rolls ahead of time, as they stay fresh in the fridge for a few days. Just put them away after the folding step, and pan-fry them right before eating. I recommend putting aluminum foil in-between the individual rolls when stored away as they will otherwise stick together.
Recipe credit
I tried out different versions of this recipe, all stemming from TikTok. I started out with this version, tried this one next, and finally landed on this one. I liked the last one by far the best, but after a few practice rounds, I added a lot of details and made countless improvements, especially to the measurements. The homemade tteokbokki sauce ingredients are taken directly from My Korean Kitchen.

Spicy Noodle Spring Rolls
Ingredients
- 12 sheets small rice paper (16cm diameter) if larger, read post text above!
- 12 slices processed cheese (the soft, easy-melting kind) 18 if using larger rice paper
- 3 sheets nori 6 if using larger rice paper
- 3 blocks curly instant noodles or Mie noodles
- some white sesame
- some neutral cooking oil
Tteokbokki sauce
- 3 tbsp gochujang
- 1.5 tbsp white sugar
- 1 tbsp soy sauce
- 2 cloves garlic
- 1 tsp gochugaru or other chili flakes
Instructions
Prepare fillings
- Put a large pot of salt water on the stove over high heat.
- Meanwhile, peel the garlic and squeeze through a garlic press (or mince finely).
- Mix the ingredients for the tteokbokki sauce together in a bowl and stir well.
- Once the water boils, cook the noodles according to package instructions, ideally a little shorter because they will be subjected to more heat later. (One minute in the water is usually enough.)
- Drain noodles and set aside. Once cooled a little, stir in the tteokbokki sauce.
Prepare the wrapping
- Set aside a deep plate or bowl of water that is wider than your rice paper.
- Prepare a surface for assembling the rolls. Do not use wood, it's too sticky!
- Cut the nori leaves in such a way that they fit the rice paper, leaving a generous rim around the edges. (See visual guide and notes in the post above.)
- If needed, cut the cheese so your slice(s) will cover the nori leaf more or less fully.
Roll!
- Repeat the following steps until you're out of ingredients. (See process photos!)
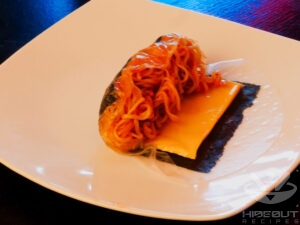
- Dip the rice paper in water (one second is enough) and place it on the surface.
- Sprinkle some white sesame seeds on the rice paper.
- Place a pre-cut sheet of nori on top.
- Next, roughly cover the nori with a slice of cheese (or 1.5 slices if needed).
- Place some sauce-covered noodles on one side, covering less than half the cheese.
- Start rolling from the side where the noodles are placed. Fold in the sides from left and right on that same side while rolling. Keep applying pressure as you go, finally wrap the opposite end of the rice paper around so it sticks to itself.
- Set the finished rolls aside for frying.
Fry
- If you're making more than two servings, preheat the oven to 80-100° C and place a plate inside to keep the rolls warm while the rest are being fried.
- Put a generous amount of oil into a nonstick pan over medium high heat.
- Fry the rolls in batches. You don't want them touching each other in the pan, as the rice paper rips easily.
- Carefully flip the rolls individually 2-3 times, frying each side for about 2 minutes.
- Repeat until all rolls are done and serve immediately.